MCP คืออะไร? ต่างจาก API ยังไง? เปรียบเทียบให้เข้าใจง่าย
บทนำ
ในยุคที่ AI และ Large Language Models (LLMs) กำลังเปลี่ยนแปลงวิธีการทำงานของเรา หนึ่งในความท้าทายใหญ่คือ “ทำอย่างไรให้ AI เข้าถึงข้อมูลของเราได้อย่างปลอดภัยและมีประสิทธิภาพ?”
MCP (Model Context Protocol) คือคำตอบใหม่ที่ Anthropic พัฒนาขึ้นมา — แต่มันต่างจาก API ที่เราคุ้นเคยอย่างไร? บทความนี้จะอธิบายให้เข้าใจง่าย พร้อมตัวอย่างการใช้งานจริง
MCP คืออะไร?
MCP (Model Context Protocol) คือ โปรโตคอลมาตรฐาน ที่ออกแบบมาให้ AI/LLM สามารถเชื่อมต่อกับ data sources และ tools ต่างๆ ได้อย่างเป็นระบบ
ลองนึกภาพแบบนี้:
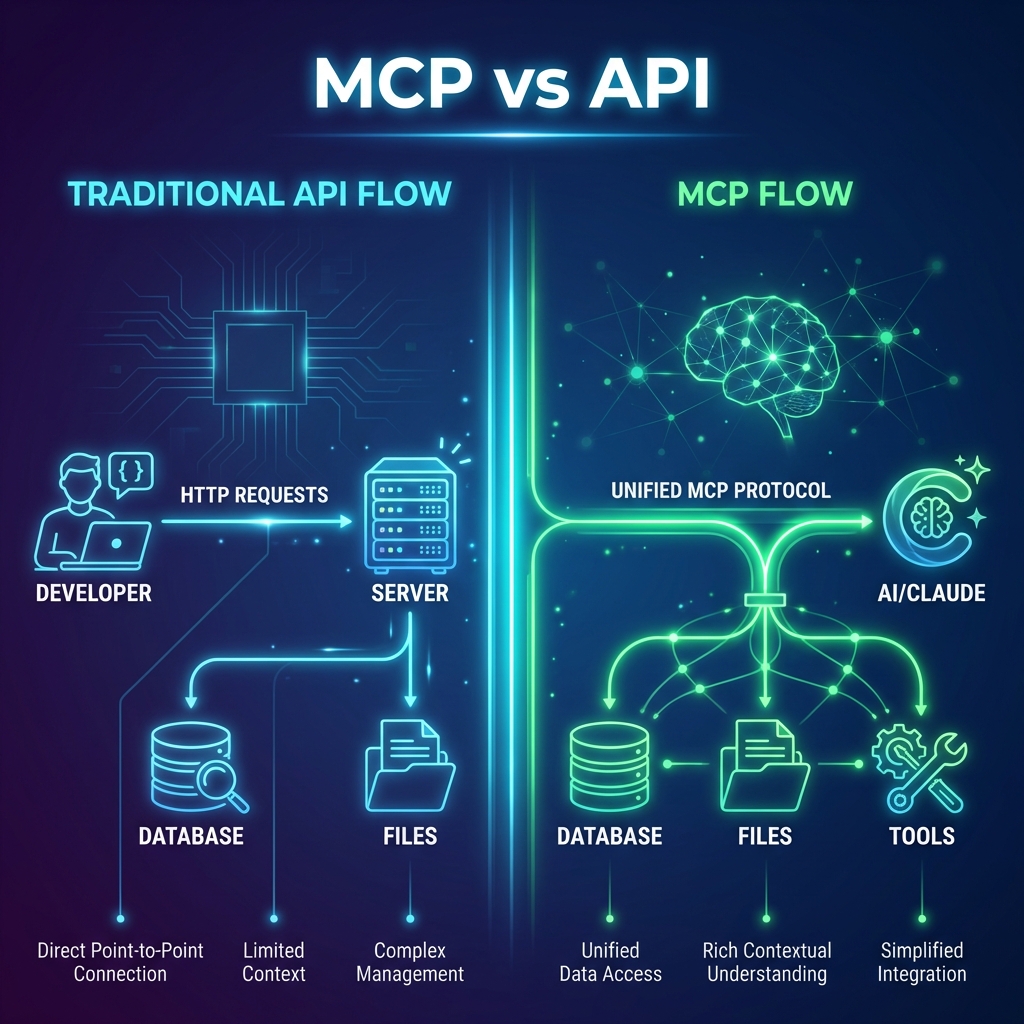
- API เหมือน “ประตู” ไปยังบริการหนึ่งๆ
- MCP เหมือน “ล่าม” ที่ช่วยให้ AI เข้าใจและใช้งานประตูเหล่านั้นได้เอง
MCP ทำงานอย่างไร?
┌─────────────┐     MCP Protocol     ┌─────────────┐
│   AI Host   │◀────────────────────▶│ MCP Server  │
│  (Claude)   │                      │ (Data/Tools)│
└─────────────┘                      └─────────────┘
       │                                    │
       │ - ถาม "ยอดขายเดือนนี้เท่าไหร่?"         │
       │◀──────────────────────────────────▶│
       │ - Query Database                   │
       │ - Return: 1.2M                     │
       │                                    │
MCP ประกอบด้วย 3 ส่วนหลัก:
- Resources — ข้อมูลที่ AI สามารถอ่านได้ (เช่น ไฟล์, database)
- Tools — ฟังก์ชันที่ AI สามารถเรียกใช้ได้ (เช่น ส่งอีเมล, สร้างไฟล์)
- Prompts — templates สำหรับการทำงานที่ซับซ้อน
API คืออะไร?
API (Application Programming Interface) คือ interface ที่ให้โปรแกรมหนึ่งสื่อสารกับอีกโปรแกรมหนึ่ง
┌─────────────┐     HTTP Request     ┌─────────────┐
│   Client    │─────────────────────▶│   Server    │
│  (App/Bot)  │◀─────────────────────│   (API)     │
└─────────────┘     HTTP Response    └─────────────┘
API ทำงานแบบ Request-Response:
- Client ส่ง request พร้อม parameters
- Server ประมวลผลและส่ง response กลับ
เปรียบเทียบ MCP vs API
| คุณสมบัติ | API | MCP |
|---|---|---|
| วัตถุประสงค์ | เชื่อมต่อระหว่าง applications | เชื่อมต่อ AI กับ data/tools |
| ผู้เรียกใช้ | Developer เขียน code | AI ตัดสินใจเอง |
| Standardization | หลากหลาย (REST, GraphQL, etc.) | มาตรฐานเดียวกัน |
| Discovery | ต้องอ่าน documentation | AI เข้าใจ capabilities เอง |
| Context | ไม่มี context ข้ามการเรียก | มี context ต่อเนื่อง |
| Security | API Key, OAuth | Capability-based access |
ความแตกต่างสำคัญ
API = Developer-Centric
Developer → เขียน Code → เรียก API → ได้ผลลัพธ์MCP = AI-Centric
User → พูดกับ AI → AI เลือกและเรียก MCP → ได้ผลลัพธ์Use Cases เปรียบเทียบ
🔍 Use Case 1: ค้นหาข้อมูลลูกค้า
แบบ API — สิ่งที่ Developer ต้องทำ:
- อ่าน API Documentation — ศึกษาว่า endpoint ไหนใช้ดึงข้อมูลลูกค้า, format response เป็นอย่างไร
- จัดการ Authentication — ขอ API Key หรือ setup OAuth
- เขียน Code เรียก API หลายครั้ง — เพราะข้อมูลอาจกระจายหลาย endpoint
// 1. Setup authentication
const headers = { 'Authorization': `Bearer ${API_KEY}` };

// 2. เรียก API ดึงข้อมูลลูกค้า
const customerRes = await fetch('https://api.crm.com/v1/customers/12345', { headers });
const customer = await customerRes.json();

// 3. เรียก API อีกตัวเพื่อดึงคำสั่งซื้อ
const ordersRes = await fetch(`https://api.crm.com/v1/orders?customer_id=12345`, { headers });
const orders = await ordersRes.json();

// 4. เขียน logic รวมข้อมูลเอง
const summary = {
  name: customer.name,
  totalOrders: orders.length,
  totalSpent: orders.reduce((sum, o) => sum + o.amount, 0)
};
แบบ MCP — ผู้ใช้แค่พิมพ์:
User: "ช่วยสรุปประวัติการสั่งซื้อของลูกค้า ID 12345 หน่อย"
AI: [เข้าถึง CRM → ดึงข้อมูลลูกค้า → ดึงคำสั่งซื้อ → วิเคราะห์ → สรุปให้อัตโนมัติ]
📊 Use Case 2: สร้าง Report ยอดขาย
แบบ API — สิ่งที่ Developer ต้องทำ:
- เชื่อมต่อ Database — setup connection string, credentials
- เขียน Query — ต้องรู้ schema ของ database
- Process Data — แปลงข้อมูลให้เป็นรูปแบบที่ต้องการ
- Generate PDF — ใช้ library เพิ่มเติม
import psycopg2
import pandas as pd
from reportlab.lib.pagesizes import A4
from reportlab.pdfgen import canvas

# 1. เชื่อมต่อ Database
# ⚠️ Never hardcode credentials in production! Use environment variables.
conn = psycopg2.connect(
    host=os.getenv("DB_HOST", "db.company.com"),
    database=os.getenv("DB_NAME", "sales_db"),
    user=os.getenv("DB_USER"),
    password=os.getenv("DB_PASSWORD")
)

# 2. Query ข้อมูล
query = """
    SELECT product_name, SUM(amount) as total
    FROM sales
    WHERE sale_date BETWEEN '2024-01-01' AND '2024-12-31'
    GROUP BY product_name
    ORDER BY total DESC
"""
df = pd.read_sql(query, conn)

# 3. สร้าง PDF
c = canvas.Canvas("sales_report.pdf", pagesize=A4)
c.drawString(100, 800, "Sales Report 2024")
# ... เขียน logic วาดตารางเพิ่มเติม
c.save()
แบบ MCP — ผู้ใช้แค่พิมพ์:
User: "สร้าง report ยอดขายปี 2024 เป็น PDF"
AI: [เข้าถึง database → query ข้อมูล → วิเคราะห์ → สร้าง PDF → ส่งไฟล์ให้]
📧 Use Case 3: ส่งอีเมลอัตโนมัติ
แบบ API — สิ่งที่ Developer ต้องทำ:
- เลือก Email Provider — Mailgun, SendGrid, AWS SES, etc.
- สมัครและ Setup — verify domain, ตั้งค่า DNS records
- ติดตั้ง SDK — ติดตั้ง library ของ provider
- สร้าง Email Template — เขียน HTML template
- Handle Errors — จัดการกรณีส่งไม่สำเร็จ
import Mailgun from 'mailgun.js';
import formData from 'form-data';

// 1. Setup client
const mailgun = new Mailgun(formData);
const mg = mailgun.client({
  username: 'api',
  key: process.env.MAILGUN_API_KEY
});

// 2. ดึงข้อมูล order (ต้องเรียก API อื่นอีก)
const order = await getOrderDetails(orderId);

// 3. สร้าง HTML template
const emailHtml = `
  <h1>Order Confirmation #${order.id}</h1>
  <p>Thank you for your order, ${order.customerName}!</p>
  <table>
    ${order.items.map(item => `<tr><td>${item.name}</td><td>${item.price}</td></tr>`).join('')}
  </table>
  <p>Total: ${order.total}</p>
`;

// 4. ส่งอีเมล
try {
  await mg.messages.create('yourdomain.com', {
    from: '[email protected]',
    to: order.customerEmail,
    subject: `Order Confirmation #${order.id}`,
    html: emailHtml,
    attachment: await generateInvoicePDF(order) // ต้องเขียนอีก function
  });
} catch (error) {
  console.error('Email failed:', error);
  // Handle retry logic...
}
แบบ MCP — ผู้ใช้แค่พิมพ์:
User: "ส่งอีเมลยืนยันคำสั่งซื้อ #1234 ให้ลูกค้า พร้อมแนบใบเสร็จ"
AI: [ดึงข้อมูล order → สร้างเนื้อหาอีเมล → สร้างใบเสร็จ PDF → ส่งอีเมล → แจ้งผล]
🗂️ Use Case 4: จัดการไฟล์ใน Cloud Storage
แบบ API — สิ่งที่ Developer ต้องทำ:
- เลือก Provider — AWS S3, Google Cloud Storage, Azure Blob, Google Drive
- Setup Credentials — สร้าง service account, download key file
- เรียนรู้ SDK แต่ละตัว — แต่ละ provider มี API ต่างกัน!
- Handle Permissions — ตั้งค่า IAM, sharing settings
# ถ้าเป็น AWS S3
import boto3

s3 = boto3.client(
    's3',
    aws_access_key_id='AKIA...',
    aws_secret_access_key='secret...'
)

s3.upload_file(
    'report.pdf',
    'my-company-bucket',
    'reports/2024/january/report.pdf'
)

# =====================================================
# ถ้าเป็น Google Drive — ต้องเขียนใหม่หมด!
from google.oauth2 import service_account
from googleapiclient.discovery import build
from googleapiclient.http import MediaFileUpload

credentials = service_account.Credentials.from_service_account_file('credentials.json')
drive_service = build('drive', 'v3', credentials=credentials)

file_metadata = {
    'name': 'report.pdf',
    'parents': ['folder_id_here']
}
media = MediaFileUpload('report.pdf', mimetype='application/pdf')

file = drive_service.files().create(
    body=file_metadata,
    media_body=media,
    fields='id'
).execute()
แบบ MCP — ผู้ใช้แค่พิมพ์:
User: "อัปโหลด report.pdf ไปที่ Google Drive โฟลเดอร์ Reports"
AI: [เลือก Google Drive MCP → หา folder → อัปโหลด → แชร์ลิงก์กลับมา]
📅 Use Case 5: นัดประชุมอัตโนมัติ
แบบ API — สิ่งที่ Developer ต้องทำ:
- OAuth Flow — ขอ permission เข้าถึงปฏิทินของทุกคน
- ดึง Free/Busy — เรียก API เช็คเวลาว่างของแต่ละคน
- เขียน Algorithm — หาช่วงเวลาที่ทุกคนว่างตรงกัน
- สร้าง Event — เรียก API สร้างนัดหมาย
- ส่ง Invites — ส่ง email invite ให้ผู้เข้าร่วม
import { google } from 'googleapis';

// 1. Setup OAuth (ต้อง handle token refresh ด้วย)
const oauth2Client = new google.auth.OAuth2(CLIENT_ID, CLIENT_SECRET, REDIRECT_URL);
oauth2Client.setCredentials(tokens);
const calendar = google.calendar({ version: 'v3', auth: oauth2Client });

// 2. ดึงเวลาว่างของแต่ละคน
const attendees = ['[email protected]', '[email protected]', '[email protected]'];
const freeBusyRequests = await Promise.all(
  attendees.map(async (email) => {
    const busy = await calendar.freebusy.query({
      requestBody: {
        timeMin: new Date().toISOString(),
        timeMax: new Date(Date.now() + 7 * 24 * 60 * 60 * 1000).toISOString(),
        items: [{ id: email }]
      }
    });
    return { id: email, busy };
  })
);

// 3. หาช่วงเวลาที่ว่างตรงกัน (ต้องเขียน algorithm เอง!)
const commonSlots = findCommonAvailability(freeBusyRequests);
const selectedSlot = commonSlots[0];

// 4. สร้าง event
await calendar.events.insert({
  calendarId: 'primary',
  requestBody: {
    summary: 'Sprint Planning',
    start: { dateTime: selectedSlot.start },
    end: { dateTime: selectedSlot.end },
    attendees: attendees.map(email => ({ email }))
  },
  sendUpdates: 'all'
});
แบบ MCP — ผู้ใช้แค่พิมพ์:
User: "นัดประชุมกับทีม Dev วันพรุ่งนี้ช่วงบ่าย เรื่อง Sprint Planning"
AI: [เช็คปฏิทินทุกคน → หาเวลาว่างร่วม → เสนอเวลา → สร้างนัดหมาย → ส่ง invite]
🔧 Use Case 6: Debug และตรวจสอบ Logs
แบบ API — สิ่งที่ Developer ต้องทำ:
- รู้จัก Tools — kubectl, aws cli, gcloud, หรือ API ของ logging service
- เข้าใจ Query Syntax — แต่ละระบบมี syntax ต่างกัน
- Handle Large Data — logs อาจมีเป็นล้าน entries
- Parse และ Analyze — ต้องเขียน script วิเคราะห์เอง
# Kubernetes - ต้องรู้ namespace, deployment name, container name
kubectl logs -n production deployment/api-server --since=1h | grep -E "ERROR|FATAL"

# AWS CloudWatch - ต้องรู้ log group, filter syntax
aws logs filter-log-events \
  --log-group-name /ecs/production/api-server \
  --filter-pattern "ERROR" \
  --start-time $(date -d '1 hour ago' +%s000) \
  --query 'events[*].message' \
  --output text

# หรือถ้าใช้ Datadog API
curl -X POST "https://api.datadoghq.com/api/v2/logs/events/search" \
  -H "DD-API-KEY: ${DD_API_KEY}" \
  -H "DD-APPLICATION-KEY: ${DD_APP_KEY}" \
  -d '{
    "filter": {
      "query": "status:error service:api-server",
      "from": "now-1h",
      "to": "now"
    }
  }'
แบบ MCP — ผู้ใช้แค่พิมพ์:
User: "ช่วยหา error ที่เกิดขึ้นใน production ชั่วโมงที่แล้ว แล้ววิเคราะห์สาเหตุให้หน่อย"
AI: [เข้าถึง logs → filter errors → จัดกลุ่มตามประเภท → วิเคราะห์ stack trace → แนะนำวิธีแก้]
💬 Use Case 7: ตอบคำถามลูกค้าจาก Knowledge Base
แบบ API — สิ่งที่ Developer ต้องทำ:
- Setup Search Engine — Elasticsearch, Algolia, หรือ Vector DB
- Index เอกสาร — แปลงเอกสารเป็น format ที่ search ได้
- เขียน Search Query — optimize relevance scoring
- Build Response — เลือกคำตอบที่ดีที่สุด, format response
import { Client } from '@elastic/elasticsearch';

// 1. Setup client
const client = new Client({ node: 'https://elasticsearch.company.com' });

// 2. Search query (ต้อง tune relevance ให้ดี)
const result = await client.search({
  index: 'knowledge_base',
  body: {
    query: {
      multi_match: {
        query: 'return policy refund',
        fields: ['title^2', 'content', 'tags'],
        fuzziness: 'AUTO'
      }
    },
    highlight: {
      fields: { content: {} }
    }
  }
});

// 3. เลือก top result
const topHit = result.hits.hits[0];
const answer = topHit._source.content;

// 4. อาจต้องใช้ NLP เพิ่มเพื่อสรุปคำตอบ
// ... ต้อง integrate กับ LLM API อีกที
แบบ MCP — ผู้ใช้แค่พิมพ์:
User: "ลูกค้าถามว่า policy การคืนสินค้าเป็นยังไง ช่วยร่างคำตอบให้หน่อย"
AI: [ค้นหาใน Knowledge Base → อ่านเอกสารที่เกี่ยวข้อง → สรุปเป็นภาษาที่เข้าใจง่าย → ร่างข้อความตอบกลับ]
📈 Use Case 8: วิเคราะห์ข้อมูลแบบ Ad-hoc
แบบ API — สิ่งที่ Developer ต้องทำ:
- รู้ Database Schema — ต้องเข้าใจว่าตารางไหนเก็บข้อมูลอะไร, relationship เป็นอย่างไร
- เขียน SQL — ต้องมีความรู้ SQL ระดับ intermediate ขึ้นไป
- Optimize Query — ถ้าข้อมูลเยอะ ต้อง tune performance
- Visualize — ต้องใช้ tool เพิ่มเติมเพื่อทำกราฟ
-- ต้องรู้ว่าตาราง orders มี column อะไร, join กับอะไรได้
-- ต้องรู้ว่า product_category อยู่ตาราง products

SELECT
  p.category_name,
  SUM(oi.quantity * oi.unit_price) as total_revenue,
  COUNT(DISTINCT o.order_id) as order_count,
  AVG(oi.quantity * oi.unit_price) as avg_order_value
FROM orders o
JOIN order_items oi ON o.order_id = oi.order_id
JOIN products p ON oi.product_id = p.product_id
WHERE o.order_date >= '2024-01-01'
  AND o.order_date < '2025-01-01'
  AND o.status = 'completed'
GROUP BY p.category_name
ORDER BY total_revenue DESC
LIMIT 10;

-- แล้วต้อง export ไป Excel หรือใช้ Python plot graph อีก
แบบ MCP — ผู้ใช้แค่พิมพ์:
User: "สินค้าประเภทไหนทำยอดขายสูงสุดปีนี้? ช่วยทำเป็นกราฟให้ด้วย"
AI: [เข้าใจคำถาม → ดู schema → สร้าง query ที่เหมาะสม → รัน → สร้างกราฟ → อธิบาย insight]
เมื่อไหร่ควรใช้อะไร?
✅ ใช้ API เมื่อ:
- ต้องการ ควบคุมแบบละเอียด ว่าจะเรียกอะไร อย่างไร
- เป็น integration แบบ fixed ที่ไม่เปลี่ยนแปลงบ่อย
- ต้องการ performance สูงสุด และ latency ต่ำ
- ระบบ ไม่มี AI เป็นส่วนประกอบ
✅ ใช้ MCP เมื่อ:
- ต้องการให้ AI ตัดสินใจ ว่าจะใช้เครื่องมือไหน
- ผู้ใช้ต้องการ interact ด้วยภาษาธรรมชาติ
- งานมี ความหลากหลาย และเปลี่ยนแปลงตาม context
- ต้องการ ลด development time สำหรับ AI integration
ตัวอย่าง MCP Servers ที่น่าสนใจ
| MCP Server | ทำอะไรได้ |
|---|---|
| filesystem | อ่าน/เขียนไฟล์ในเครื่อง |
| github | จัดการ repos, issues, PRs |
| postgres | Query database |
| slack | ส่งข้อความ, อ่าน channels |
| google-drive | จัดการไฟล์ใน Drive |
| brave-search | ค้นหาข้อมูลจากเว็บ |
สรุป
| API | MCP | |
|---|---|---|
| สำหรับใคร | Developer | AI + End User |
| วิธีใช้ | เขียน Code | พูด/พิมพ์ภาษาธรรมชาติ |
| ความยืดหยุ่น | Fix ตาม code | Dynamic ตาม context |
| Learning Curve | ต้องเรียนรู้แต่ละ API | AI เรียนรู้เอง |
MCP ไม่ได้มาแทนที่ API — แต่เป็น layer ใหม่ ที่ทำให้ AI สามารถใช้งาน API และเครื่องมือต่างๆ ได้อย่างอัจฉริยะ
หากองค์กรของคุณกำลังพัฒนา AI Solutions หรือต้องการ integrate LLM เข้ากับระบบภายใน MCP คือตัวเลือกที่ควรพิจารณาอย่างยิ่ง
📚 อ่านเพิ่มเติม: MCP Official Documentation
ติดต่อเรา
สนใจพัฒนา AI Integration หรือต้องการคำปรึกษาเกี่ยวกับ MCP และ API Design?
Cloudsoft พร้อมให้บริการออกแบบและพัฒนาระบบซอฟต์แวร์ ด้วยทีมผู้เชี่ยวชาญที่มีประสบการณ์
📞 ติดต่อขอคำปรึกษา หรือสอบถามข้อมูลเพิ่มเติมได้เลยครับ